Saturday, June 21, 2008

Summer Solstice

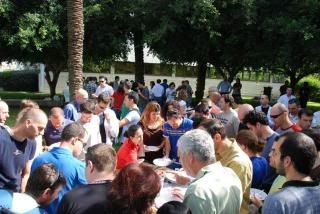
I made a variety of cupcakes this weekend as I am preparing to go on vacation back home. These are Butter and Chocolate cupcakes topped with Cream Cheese Frosting.

For the Butter Cupcakes, I used the Ultimate Butter Cake recipe and I found
Elle and Vire in one of the supermarkets here. Elle and Vire is an expensive French Butter which is being used in many successful commercial cupcake sellers and I tried it to see the difference with the regular Israeli butter that I am using. There is totally no difference in the taste of the baked cupcake. The only difference that I noticed is in the texture which turned out to be a little more smooth. Otherwise, it's totally the same! Oh well.


As for the chocolate cupcakes, Manny brought me some Ghirardelli chocolates from SFO. Chocolates here in Israel are abundant, from the more expensive Belgian/Swiss brands to the cheap locally produced ones. However, there are no Ghirardelli chocolates here. Manny bought me a lot of variety and for this cupcake, I used the semisweet chocolate chips. The chips are bigger than the normal chips, they're almost as big as the Hershey's kisses. The chocolate cupcakes turned out to be very moist and tasty. The kind of chocolate used really made a huge difference in the cupcakes.


I used Cream Cheese Frosting for both cupcakes. We kind of started liking the Cream Cheese Frosting because it's not too sweet and has a tangy taste. I normally use it for the Cinnamon Rolls and the Red Velvet Cake, only to realize now that they actually taste very good with chocolates. I always use Philadelphia.

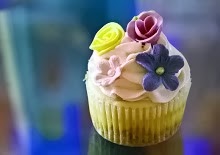
The cupcakes were then topped with Frangipani sugar flowers with sugar pearls in the middle. I always get asked if the middle pieces are edible, and I always say, everything is edible - from the flowers to the dragees. The flowers are in Pink Rose and Blue with the Pink ones sprayed with pink edible mist and the Blue ones sprayed with yellow mist. I was pleasantly surprised at how the combination of the Blue flower and Yellow mist turned out to be - tropical like.

The cupcakes turned out to be very pretty with the bright colors. It reminds me of my favorite time of the year - Summer!


Monday, June 9, 2008

Pecan Carrot Cupcakes

Today's my first time making a Carrot Cake and for the longest time, I never fancied making one. I tasted a Carrot Cake once and it was horrible, hence my dislike. However, over the past few days, a Carrot Cake recipe caught my attention and it's a very simple recipe called Classic Carrot Cake by Susan Purdy which I found in baking911 and had been since adapted by Sarah Phillips. I decided to give it a try after buying some carrots in the grocery for my chopseuy.

The batter was very easy to make. I had almost a cup full of grated carrots on the side before I started with everything else. The recipe also uses a few spices like cinnamon and ground nutmeg to, well...spice it up! After mixing everything, the resulting batter was a little thin but should hold good enough in the cupcake liners. While walnuts are regular garnish for Carrot Cakes (as I read it, it's not like I have eaten a fair share of Carrot Cakes!), I opted to use Pecans instead. The chopped Pecans were then added last to the batter.

I made a very small recipe (half of the original recipe) so that I would be making only a very few cuppies just in case I don't like it. The reduced recipe yielded batter for 7 liners. So I then poured (yes it's that thin, it can be poured!) the batter into the cupcake liners and baked for around 20mins. The cupcakes domed nicely after baking. I immediately took it out of the oven, took the cupcakes out of the tin and then let it cool in a wire rack for around 10 minutes. While the cupcakes were cooling, I started making the Cream Cheese Frosting for the cupcakes. I love Cream Cheese Frosting so I was telling the Carrot cupcakes to better be good or else I'd be wasting my cream cheese over them! LOL!
With everything ready, what is left is the assembly of the cupcakes. I swirled the frosting over the cupcakes and I also topped it with a homemade sugar roses. The colors of the roses are not my colors (Burgundy and Peach) but I tried it because those little color bottles are still unopened (plus my Pink and Yellow were almost done). I think the new colors worked beautifully with the Off-White frosting.

I was prepared to hate the taste of my beautiful little cupcakes. After staring at it for a few minutes and contemplating on whether to taste it or not, I decided to try it since no one else is here to try it. I took a bite and was pleasantly surprised at how good it tasted. It was fluffy and moist, and the the carrots were not overpowering. Needless to say, I loved how it tasted like and I will definitely be baking more of this. The cream cheese frosting provided a nice tangy contrast to the cinnamon/nutmeg spices. Overall, it's just lovely. ;)

Saturday, June 7, 2008

Lemon Cream Tart

Even if the lighting is bad and all, I just had to take a photo of my little Lemon Cream Tart before I demolish it!

This is my first attempt at making my own pie crust/tart crust and I was pleasantly surprised that it stood up, tasted good and tender on the bite. I don't have the pie/tart pans so I made use of my 4-inch springform pan so it does not look like the traditional tart crusts with ridges (i.e. Goldilocks tarts).

The Lemon Cream recipe is an adaptation of Pierre Herme's recipe. It uses 4 Meyer lemons including the zest which infuses an aroma that will surely envelop your kitchen once you start preparing the cream. I found this recipe in one of the sites that I read (not sure exactly where, maybe from Dorie Greenspan's) and I got excited with it because it looks elegant yet the ingredients were pretty common to be readily available right out of your kitchen - sugar, salt, baking powder, eggs, butter and lemon. So while the crust is baking, I mixed all the cream ingredients except the butter and whisked it over a double broiler until it thickened and reached 180F. Once done, I transferred it to a mixing bowl where I beat it on high and combined the butter. After a few minutes of beating, the resulting cream was an emulsion that is so silky and smooth. After chilling it for a few minutes, I scooped the cream onto the prepared crust and voila, it's ready to eat! And the taste? Sinfully, melts in the mouth goodness!


Thursday, June 5, 2008

The Cheesecake Contest

I did not win the Cheesecake contest in our office. There were around 15 contestants and only 1 winner was picked. However, my cake did me very proud because it looked pretty. I kept saying that if it were only for presentation, my cake would have already won and then after trying it afterwards, it really tasted very good! After the judging, we tasted all the entries and Daniel kept saying that mine is sure to be in the top 3! But then again, they only picked one winner and his (yeah he's a guy) cheesecake was also very good with some sugar crumbs on top. The winning cheesecake was more traditionally Israeli as well, I think he used ricotta for the cheese. As a prize, he got some restaurant vouchers.

I got an Israeli pastry book as a prize. The book was very fancy with glossy pages, but was written in Hebrew! Even if I could not understand a thing written on it, I will keep the book as a reminder that I once had the guts to join a cake contest. Hehe. It was totally fun, and it is especially heartwarming hearing compliments on how good the cake tasted or how beautiful it looked like. It was a wonderful experience that I'd remember for a long time.

After a few thought, I decided to make Sarah Phillip's Luscious and No Crack
Cheesecake. For me, cheesecakes are the hardest to make as they are the most fragile. A little slip on the side can ruin the entire cake and frosting cannot hide cracks. As it turned out, the recipe was very baker friendly with Sarah's detailed explanations of each step. After 1 hour of baking on a water bath, here's how the cheesecake looked like in the pan. I needed to chill it for 24 hours before unmolding.
After 24 hours, I now had to do the most unnerving part which is unmolding it from the pan. It being my first time baking a whole cheesecake, I was read and re-read the theory of unmolding over and over (hehe). I did succeed in unmolding it though! Here's how it looked like after it was removed from the pan. It looks
yummy already, but the smell was so enticing! I wanted to eat it right there and then.
I know the strawberry/blueberry cheesecake won in the poll that I had here in my blog but I'm sorry that I ended up with a chocolate cheesecake. I was supposed the use whole strawberries on top of a blueberry glaze but the strawberries that I had perished in the fridge and I miscalculated the blueberry filling that I had. So I ended up thinking of other options and the next best thing is chocolate. I made some chocolate ganache and glazed it on top of the cheesecake. After letting the glaze settle down a bit, I topped it with some sugar flowers and dragees. There was a little dent on the side of the glaze but I opted not to touch it anymore because the chocolate had already started to dry down.

Making the cheesecake was pretty smooth but not without a few fuss. Here's a full view of the cake, with some chocolate glaze that got poured on the crumbs.

Bringing the cheesecake to the office was another story. Daniel helped me bring it and there were a lot of close calls like the cover almost sticking to the cake, or the mini mishaps at the elevator and at the humps on the road. Here's a photo of the cake taken at the contest. Photo is dull, I just took this on the website of the event. I'm entry #13.

And here's half of the crowd who enjoyed the cheesecakes, half of it at the back of the cameraman. It was so fun! So there goes my cheesecake story. :)


or